
Setting up a new administrator involves four steps:
- Create the employee (or use an existing employee)
- Enable admin access on their profile
- Assign department permissions so they can manage the right teams
- Configure feature access to control which screens and operations they can use
Step 1: Create a New Employee
If the person already exists as an employee, skip to Step 2.
- Navigate to Employees from the left sidebar.
- Click the Add Employee button.
- Fill in the required details:
- First Name and Last Name
- Email - this will be their login email
- Shift Pattern - select the shift pattern they will work
- Department - assign them to the relevant department(s) (if departments are enabled)
- Start Date (optional) - their work start date
- Click Create Employee.
The new employee is now created and you can access their profile.
Step 2: Enable Admin Access
- Navigate to Employees and select the employee you want to make an admin.
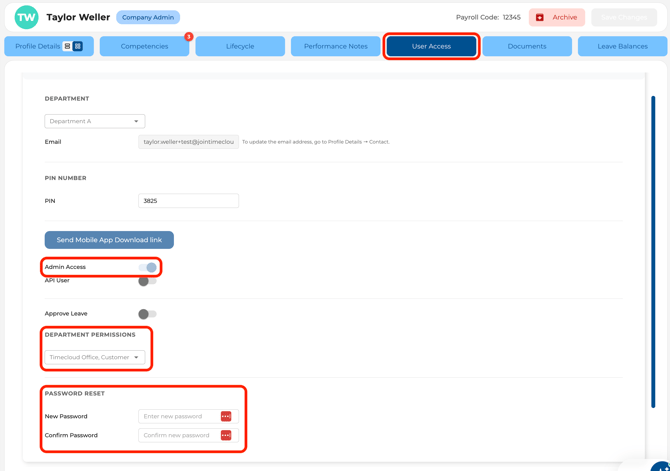
- Open the User Access tab.
- Expand the General panel.
- Toggle Admin Access to on.
- Assign the relevant Department Access for this admin.
- Department permissions control which teams the new admin can see and manage. This step is only relevant if your company uses departments.
- The admin will only see employees, rosters, attendance, and leave for the departments you have assigned.
- Set a password for the new admin:
- Passwords must be at least 10 characters with 1 uppercase letter, 1 lowercase letter, and 1 number.
- Enter the password in both the New Password and Confirm Password fields.
- Click Save in the employee header.
The employee now has admin-level access and can sign in with their email and password.
Good to know:
- The employee's PIN (used for employee-level login) is separate from their admin password.
- Once admin access is enabled, additional settings become available in the General panel (see Steps 3 and 4).
- You cannot remove admin access from the primary Company Admin. The toggle will be disabled for that user.
Additional options (when admin access is on):
- Approve Leave - Toggle on to let this admin approve leave requests for their assigned departments.
- Direct Reporting Lines - Toggle on so only direct reports appear in this admin's view (available to Company Admins setting this up).
Step 4: Configure Feature Access
Feature Access gives you fine-grained control over which screens and operations each admin can use. This is managed from a separate settings page.
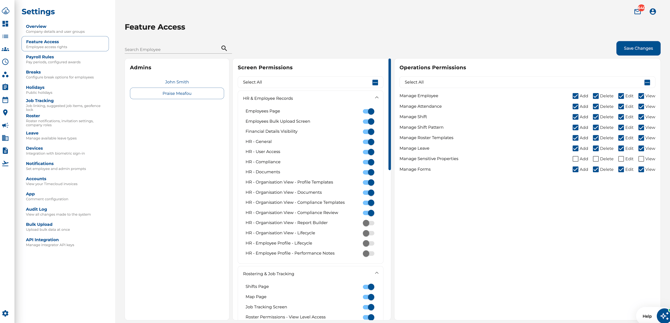
- Navigate to Settings > Feature Access.
- Select the new admin from the Admins list on the left.
- Configure their access across two areas:
Screen Permissions
Screen permissions are organised into categories (e.g. Roster, Attendance, Employees). Click a category to expand it and toggle individual screens on or off.
- Toggle a screen on to grant access; toggle it off to hide it from this admin.
- Use the Select All checkbox at the top to quickly grant or remove access to all screens.
Common screen categories include: Dashboard, Roster, Attendance, Employees, Leave, Reports, Settings, Forms, and more depending on your plan.
Operations Permissions
For each feature area, set granular access using four controls:
- Add - Can the admin create new records?
- Delete - Can the admin remove records?
- Edit - Can the admin modify existing records?
- View - Can the admin see records (read-only)?
Use the Select All checkbox to quickly grant full operations access.
- Click Save Changes when done.
Related Guides
- How to Manage Employee User Access - Full details on the User Access tab including employee permissions, mobile app, and biometric settings.
- How to Set Up Admin Permissions (Feature Access) - In-depth guide on configuring screen and operations permissions for each admin.