Correcting Timesheets
Before approving or reporting on Timesheets, it's crucial to address any attendance flags within the system. Attendance flags are missing data in the system, which will block some reports if left in the system.
Locating Flags
Flags highlight attendance records that are missing information and need to be corrected. A flag is created when a clock-in or clock-out does not have a matching pair, or when there is another gap that prevents Timecloud from calculating the correct hours on the timesheet.
Flagged records are:
- Marked with a red flag icon on the Attendance page
- Grouped when you filter by Flags, so you can focus only on problem records
Use the methods below to find and fix flagged records.
- Flag Report
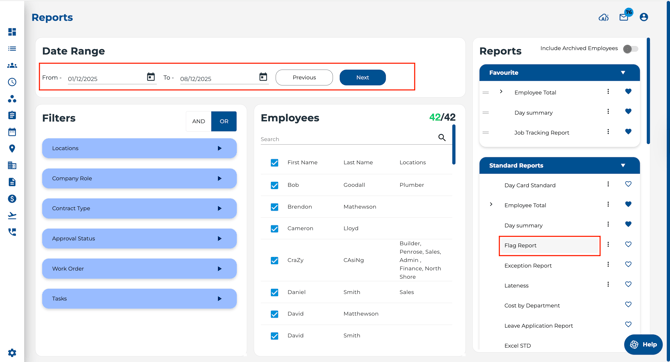
Navigate to the Reports page.Match the dates to your desired period, select the relevant filters, then click the Flag Report in the reports section.
Review the report and work through each flagged record in Attendance. A blank report indicates there are no outstanding flags.
-
Attendance Dashboard
Open the Attendance Dashboard to see real-time information on flags and other key metrics.
located on the lower right, view unresolved flags
Review the report and work through each flagged record in Attendance. A blank report indicates there are no outstanding flags.

- Attendance page
Navigate to the Attendance page.
Click the Flags indicator in the top right to show only flagged records for the selected period.
Edit each flagged time record to correct missing or duplicate clocks, then save your changes. Once all issues are resolved and hours are recalculated, the flags will clear automatically.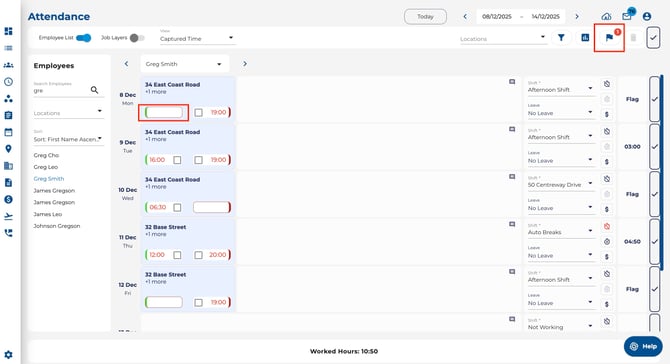
Resolving Flags
Attendance flags typically indicate a missing clock in or out, disrupting the calculation of hours. Follow these steps to rectify common errors:
- Click here for an introduction to the basics of the 'Attendance' page.
- There are some common employee errors. Use the examples below and make sure all clocks have a complete pair:
- Too Many Clocks: When employees clock in multiple times within a minute, we will need to remove excess clock-ins. This is common for mobile app users, remind them that once they see the green 'Check in Added' message, not to clock in again, even if they are worried the data hasn't saved.
- Missing Clocks: When there is a clock in with no clock out, a user simply forgot to sign out or pressed the wrong button. We will simply need to add the missing data.
- Midnight Shifts: if a user worked a shift over midnight unexpectedly, you can correct this while editing the timesheet. Change the 'Clock Out' or 'Clock In' date to indicate the employee worked until the following day.
- Use these tips if you are still having trouble with flags:
- Only 1 clock in is allowed per minute, and times will always reorder to stay in chronological order.
- Attendance & Shift times use a 24-hour format.
- Exercise caution when deleting user data, opting for edits whenever possible.
- A flag is only clear when you can see the total hours calculating on the right.
Total Hour Calculations
Total hours will be calculated for the day on the right-hand side of the page. There are several reasons why these may not be accurate yet:-
- Shift Expectations control Break Deductions and Shift Limits
- Break deductions are made automatically if configured. You can use the Shift drop down menu to remove the break by selecting a shift without a deduction.
- Shift limits and exceptions can be changed using the Shift Overrides/Limits control in the shift panel. These settings are applied on a per shift basis and control how many hours can be counted for the day
- Break deductions are made automatically if configured. You can use the Shift drop down menu to remove the break by selecting a shift without a deduction.
- Leave and Public Holidays are controlled with the leave drop down menu.
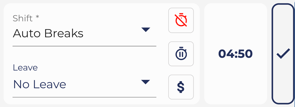
- Leave and public holidays are controlled with the Leave drop-down menu. Leave hours are calculated in red and use the shift’s expected hours to determine how many hours of leave an employee is owed.
- You can use both the Shift drop-down menu and the Shift Overrides/Limits control to correct the leave hours, or remove them using the exception menu if leave should not apply.
- Allowances
- Allowances are added or removed using the Allowances control in the shift panel.
- Allowances do not change the total worked hours, but they are included in payroll calculations, so check they are correct before approving the timesheet.
- Shift Expectations control Break Deductions and Shift Limits
Click here to learn how to Approve Timesheets.
Dashboard & Reporting
With timesheet data corrected and verified, leverage the dashboard and reporting features for further insights
Attendance Dashboard
Use the Attendance page to review and edit timesheets, monitor worked hours and prepare data for payroll.
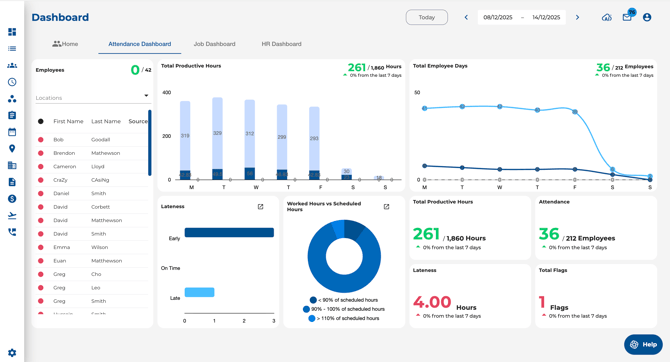
- Navigate to the Dashboards page. From the Home dashboard, click the Attendance Dashboard tab.
- Select the required period using the date picker in the top right corner, or click Today to jump to the current day.
- Filter to the required location using the Locations filter above the employee list on the left.
- Click any insight card or chart (for example, Total Productive Hours, Lateness, or Flags) to see a breakdown of individual employees.
- If using the dashboard for flags, click the pop-out button in the top right of the insight breakdown to open this in a new tab.

Reporting
Generate reports to track team data over time, including approvals and admin comments.
- Navigate to the Reports page.
- Set the required date range using the Date Range calendar at the top of the page.
- Use the Filters panel on the left to narrow down results by options such as Groups, Company Role, Contract Type, Approval Status, Work Order and Tasks. Then use the Employees card to choose which employees to include. Leaving this blank will report on all employees.
-
The AND / OR toggle above the Filters panel controls how filters are applied.
- AND will show employees who match every selected filter.
- OR will show employees who match at least one of the selected filters.
This allows you to build very targeted reports or broader summaries as needed.
- AND will show employees who match every selected filter.
- For teams using approvals, the Sign Off report will show all admin comments and approvals, allowing you to manage unapproved timesheets on a regular basis.
- By default, the Sign Off report will not include approval details. To enable these:
a. Click the three dots next to the Sign Off report to configure it.
b. In the configuration menu, toggle on Include Approval Details.
